 AutoSketch is an inexpensive drawing program. The littlest brother to Autodesk’s flagship product, AutoCAD. Retailing for about US$250, AutoSketch is an affordable tool for creating accurate technical drawings.
Installing the software is easy. The program comes on one CD and installs in a matter of minutes. There are three types of installation choices: Full, Compact, and Custom. The latter of which allows you to pick and choose which components to install.
The only real decision to make while installing AutoSketch is what unit of measure you prefer for the symbols – either Metric, or Imperial (English). After the installation is complete, you will be prompted to view the “readme” file and/or start the program.
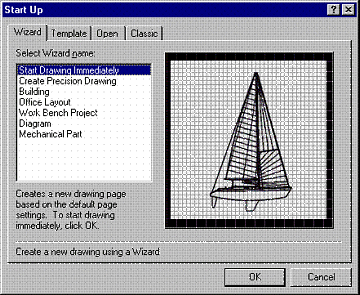
Each time you start AutoSketch, you will see a “start up” dialog box. Here, you can tell the program how you would like to work. There are four tabs to choose from: Wizard, Template, Open, and Classic. Just like AutoCAD and AutoCAD LT, if you utilize a Wizard to start a drawing, you will be asked a series of questions via dialog boxes that will automatically setup the drawing environment for you based upon your input.
For a faster startup, use one of the AutoSketch templates. There are several to choose from, including ANSI (“A” through “E”), DIN (“A0” through “A4”), ISO (“A0” through “A4”), JIS (“A0” through “A4”), ArchEng, and a few others. Or create your own template. There are six steps involved in making your own template, they are:
- Click the Template page tab in the Start Up or New dialog boxes.
- Click the Organize Templates button. The Organize Templates dialog box appears.
- Click Add. The Add Template From Drawing dialog box appears.
- Enter the filename and the folder location to use as a template in the Drawing Name text box. If you don’t know the filename or exact location, click the Browse button, then select a drawing and click OK.
- (optional) Check the Delete Existing Entities When Making Template check box. When this option is checked, all entities in a drawing are deleted from the template. Leave this check box unchecked if you want to include entities such as title blocks in the new template.
- Enter a new name for the template, then click OK. The Organize Templates dialog box appears.
 Once you’ve begun working in AutoSketch, one of the first things that you will notice is the AutoCAD “look and feel.”
There are pulldown menus, toolbars, scroll bars, and a status line (although it is not as sophisticated as AutoCAD’s command prompt). The familiar “tool tips” available in AutoCAD are a welcomed assistant when first using AutoSketch.
Drawing
Drawing in AutoSketch is easy, especially if you already know how to use CAD. If not, then the learning curve is certainly longer. As always, prior knowledge of hand drafting techniques is helpful.
To draw something in AutoSketch, go to the “Draw” pulldown menu and select the type of entity that you wish to create. Note: AutoSketch refers to basic geometry as “entities,” not as “objects,” such as in AutoCAD. There are choices for Lines, Arcs, Circles, Polylines, Polygons, Curves (Splines), Markers, Text, Dimensions, and Symbols. Let’s start with creating a line segment.
To create a line segment, execute the “single” line command by either picking it from the “draw” pulldown or from the “All-In-One” toolbar. Then select or key in the first point. To specify a coordinate accurately, or to “jump” to an existing point (such as with Osnap’s in AutoCAD), type the letter “R.” When doing so, the “Enter 2D Coordinate” dialog box will appear.
 It is within this dialogue box that X and Y coordinates can be typed in, and special object snaps (such as Endpoint, Midpoint, etc.) can be selected. Note: these osnaps are “running,” so to turn an osnap off, the “snap off” button (lower left corner of the “Enter 2D Coordinate popup) must be selected. Furthermore, it is important to note that this is the same popup which allows the selection and deselection of the “ortho” mode. The other drawing commands behave in a similar manner. First, issue the command. Second, specify the required points.
Editing/Modifying
The real test of value of any drawing program is its ability to edit existing drawings. Moving and copying entities in AutoSketch is not difficult at all. In fact, I think it’s easier in AutoSketch that it is in AutoCAD! To move an entity, simply select it, and tiny “control” boxes appear (like “grips” in AutoCAD). Select another point in the drawing, and the entity moves – no muss, no fuss.
Copying is just as easy. First, select the entity, then select “copy” from the “edit” pulldown menu. Then, select “paste” from the same pulldown, and then select the location point for the “paste” in the drawing.
A full complement of modification commands are available in AutoSketch. Go to the “edit” pulldown menu, then go to “transform.” There, you will find powerful commands like Scale, Rotate, Align, Mirror, Stretch, and Array. Also on the “edit” pulldown menu is the “trim” command. No technical drawing or CAD software is complete without it. There is also an “explode” command and an “entities” command on the “edit” pulldown menu. The lattermost of which is a quick and easy way to edit the properties of an entity – like changing its color, thickness, or layer.
Settings/Customization
Changing the environment settings in AutoSketch is done from two main popup menus – Graphic Options, and Drawing Options. Both of these are accessible from the “tools” pulldown menu.
The “Graphic Options” dialogue box has three main tabs, which allow control of the current pen settings, layers, and the drawing palette.
It is here that lines can be assigned a thickness, layers can be created and managed, and colors can be set. Similarly, the “Drawing Options” dialogue box has six main tabs, which allow control of the drawing units, grid, scale, etc. With the settings controlled by these two popup menus, taking hold of AutoSketch is well within reach.
While AutoSketch is limited in its ability to be customized, is does allow for some flexibility. For instance, commands can customized by assigning a “hot key” abbreviation for them. Unfortunately, the “hot keys” are actually a three-key combination – CTRL+SHIFT+KEY. There are no preset hot keys but creating them is relatively easy.
To access the “Customize Commands” popup, go to the “tools” pulldown menu, and select “Customize Commands.” To customize a command, first select a KEY (letters, numbers, and “F” keys are all valid choices) then scroll through the list of available commands and select the one you wish. In the image shown, the Z key is being used as a short cut for issuing the “Zoom RealTime” command.
AutoCAD vs. AutoSketch The first – and most important – distinction to make between AutoCAD (LT or regular) and AutoSketch, is that AutoCAD is a “CAD” program, and AutoSketch is a “drawing” program. This may sound trivial at first, but I assure you it is not!
For an individual (or a business for that matter) that requires a powerful piece of software capable of creating complex designs quickly in a production environment, then AutoCAD or AutoCAD LT are the products to choose. However, if the needs are not as intense (and the budget is a lot smaller), then a drawing program like AutoSketch is a welcomed tool.
Of course, the issues of file format (for data exchange), programmability (for customization), and 3D capabilities (for complex design), will also influence the decision of whether to purchase AutoSketch, AutoCAD LT, or AutoCAD.
Summary
AutoSketch is modern powerhouse when compared to its humble predecessors. Autodesk has done well for itself in migrating this program onto the Windows platform. If you are looking to create accurate technical drawings on a budget, then AutoSketch is worth your time and money.
Update Oct 2009
AutoSketch 10 works with Windows® Vista™ and features updated DWG file format compatibility.

![Autodesk Maya LT 2015 [Download]](https://www.cadinfo.net/wp/wp-content/uploads/2014/08/41q3lZY1EQL.jpg)

![Home Designer Suite [PC] [Download] 2016](https://www.cadinfo.net/wp/wp-content/uploads/2015/11/512SaYv5N1L.jpg)


nice, read here more http://autosketch-cad-training.com/